Microblading is something I’ve considered for around 3 years, and eyebrow tattoos themselves for evening longer. I’ve been addicted to the perfect brow since I first found the HD brow treatment, something I wrote about in my early days of blogging in 2012. I’d been having eyebrow treatments at H Beauty since I worked with them on my LVL treatment post and video and as soon as I knew Victoria was offering microblading I was seriously tempted. Now I’ll start this post by saying Victoria offered me my treatment in exchange for an open and honest review, and that is exactly what I intend to do. Read on to find out about my microblading experience.
The Microblading Experience
Preparing for Microblading
In preparation for my microblading treatment, I had to ensure that I did not use any acid containing products. This was pretty difficult for me as I love an acid exfoliator! I wasn’t to drink any alcohol or take aspirin or ibuprofen for 24 hours prior to treatment. I was also told to avoid the sun and not use any fake tan.
The Day of Microblading
When I arrived at H Beauty, Victoria explained the entire process to me. I was told that we’d start by reading through the consent forms and answering the health questionnaire. We’d then discuss the results I was hoping to achieve, as well as the colour I’d like to go for, then get started. Victoria recommended a set of colours, we picked two different colours and we tried them on my forehead to see how they looked against my natural skin tone (remember, no sun and no fake tan). We had picked two; one lighter, one darker, then decided something in the middle would look best, so mixed the two. Victoria applied the numbing cream as we tried the colours to my forehead and we agreed the mixed shade looked the best. I then went through all of the consent forms and signed everything before Victoria started the process.
The Microblading Process
Victoria removed the numbing cream, gave me a hair net, then began outlining my eyebrows. This took a while to ensure they were perfect and I was asked to ensure I was happy with them before we got started. Victoria started on one eyebrow, adding several hair strokes, then moved to the next eyebrow. Each time, more numbing cream was applied to the brow not being microbladed. Victoria repeated this process for around 45 minutes, then sat me up to look at my brows. We agreed for a few more hair strokes to be added. A pigment bath was then applied; the colour pigment was applied over the top of the freshly microbladed brows to ensure maximum colour. Victoria then removed the pigment and revealed my new brows. I have to say, they were even better than I’d anticipated.
The Next 5 Days
The aftercare advice I was given was to keep my fresh eyebrows dry for 5 days. Some advice online suggests otherwise, but my eyebrows healed well; no infection and colour remained. The eyebrows will begin to scab as they heal. The scabs do feel quite itchy and you must stop yourself from scratching or picking, as it could lead to a loss of colour. As you have to keep your brows dry I advise that you wash your hair the morning of the procedure and invest in some dry shampoo. I had to get my husband to wash my hair for me over the bath with a towel over my face, and I must say it wasn’t very enjoyable! Keep in mind that as your brows scab, they will appear darker in colour, do not panic, your brows will not be left this dark.
It was particularly hot in the UK when my brows were healing, but as I was unable to apply SPF, I made sure to wear a cap and large sunglasses to prevent sun exposure.
After 5 Days
On the evening of the fifth day post microblading, you need to start applying a coconut oil to the brows. You can melt the oil in a tub placed in warm water, or just let it melt when it comes into contact with the skin. Gently use a cotton bud to apply the coconut oil to your brows in a circular motion; this will remove any exfoliated scabs, but be gentle as you do not want to remove any still healing. Continue to apply to coconut oil each evening until all scabs have exfoliated.
As the brows are healing, the pigment will be carried away deeper into the dermal layer. It will then be pushed back up to the surface layers, leaving you with your final colour. This can take around 6 weeks.
The Top Up
After the first treatment, you will be required to have a top up. You can add additional hair strokes if you wish and ensure your brows are perfect. Initially I wanted very natural brows and they were quite ‘fluffy’ after the first session. I decided that I’d like a little more definition in the final results, so Victoria added additional hair strokes for me. The second session is much quicker as you’ve already decided on your colour and shape. This is usual arranged within 8 weeks of the first treatment.
What Does it Feel Like?
The best way I can describe microblading is that the pain is like that of being scratched by a cat, just more slowly. The first lot of numbing had pretty much worn off once we’d agreed on the outline and style of my brows, so the first set of hair strokes on each brow were the most painful. Once Victoria applied additional numbing cream, I genuinely couldn’t feel it, I could just hear the scratching sound. I actually had to ask if the hair strokes were being applied. By the end of the treatment you do feel like your eyebrows are very bruised.
I can’t compare microblading to that of having a regular tattoo, as I’ve never had one. It was far less uncomfortable than I anticipated, especially after the second application of numbing.
The Whole Process
Victoria put together a time lapse video of the whole process, make sure you check it out;
My work.. my passion ❣️Video insight of the full microblading appointment which consists of.. thorough consultation, choosing pigment colour on skin tone, drawing on unique perfect shape measuring etc, microblading unique natural hairstroke formation over drawn on shape, pigment bath and reveal, aftercare (approx 3hrs) Thanks to the lovely Lauren for this and looking forward to hearing her thoughts on her blog coming soon ?Instagram- victoria.microblading ? 07954389885
Gepostet von Victoria Microblading am Samstag, 19. Mai 2018
Before & After Pictures
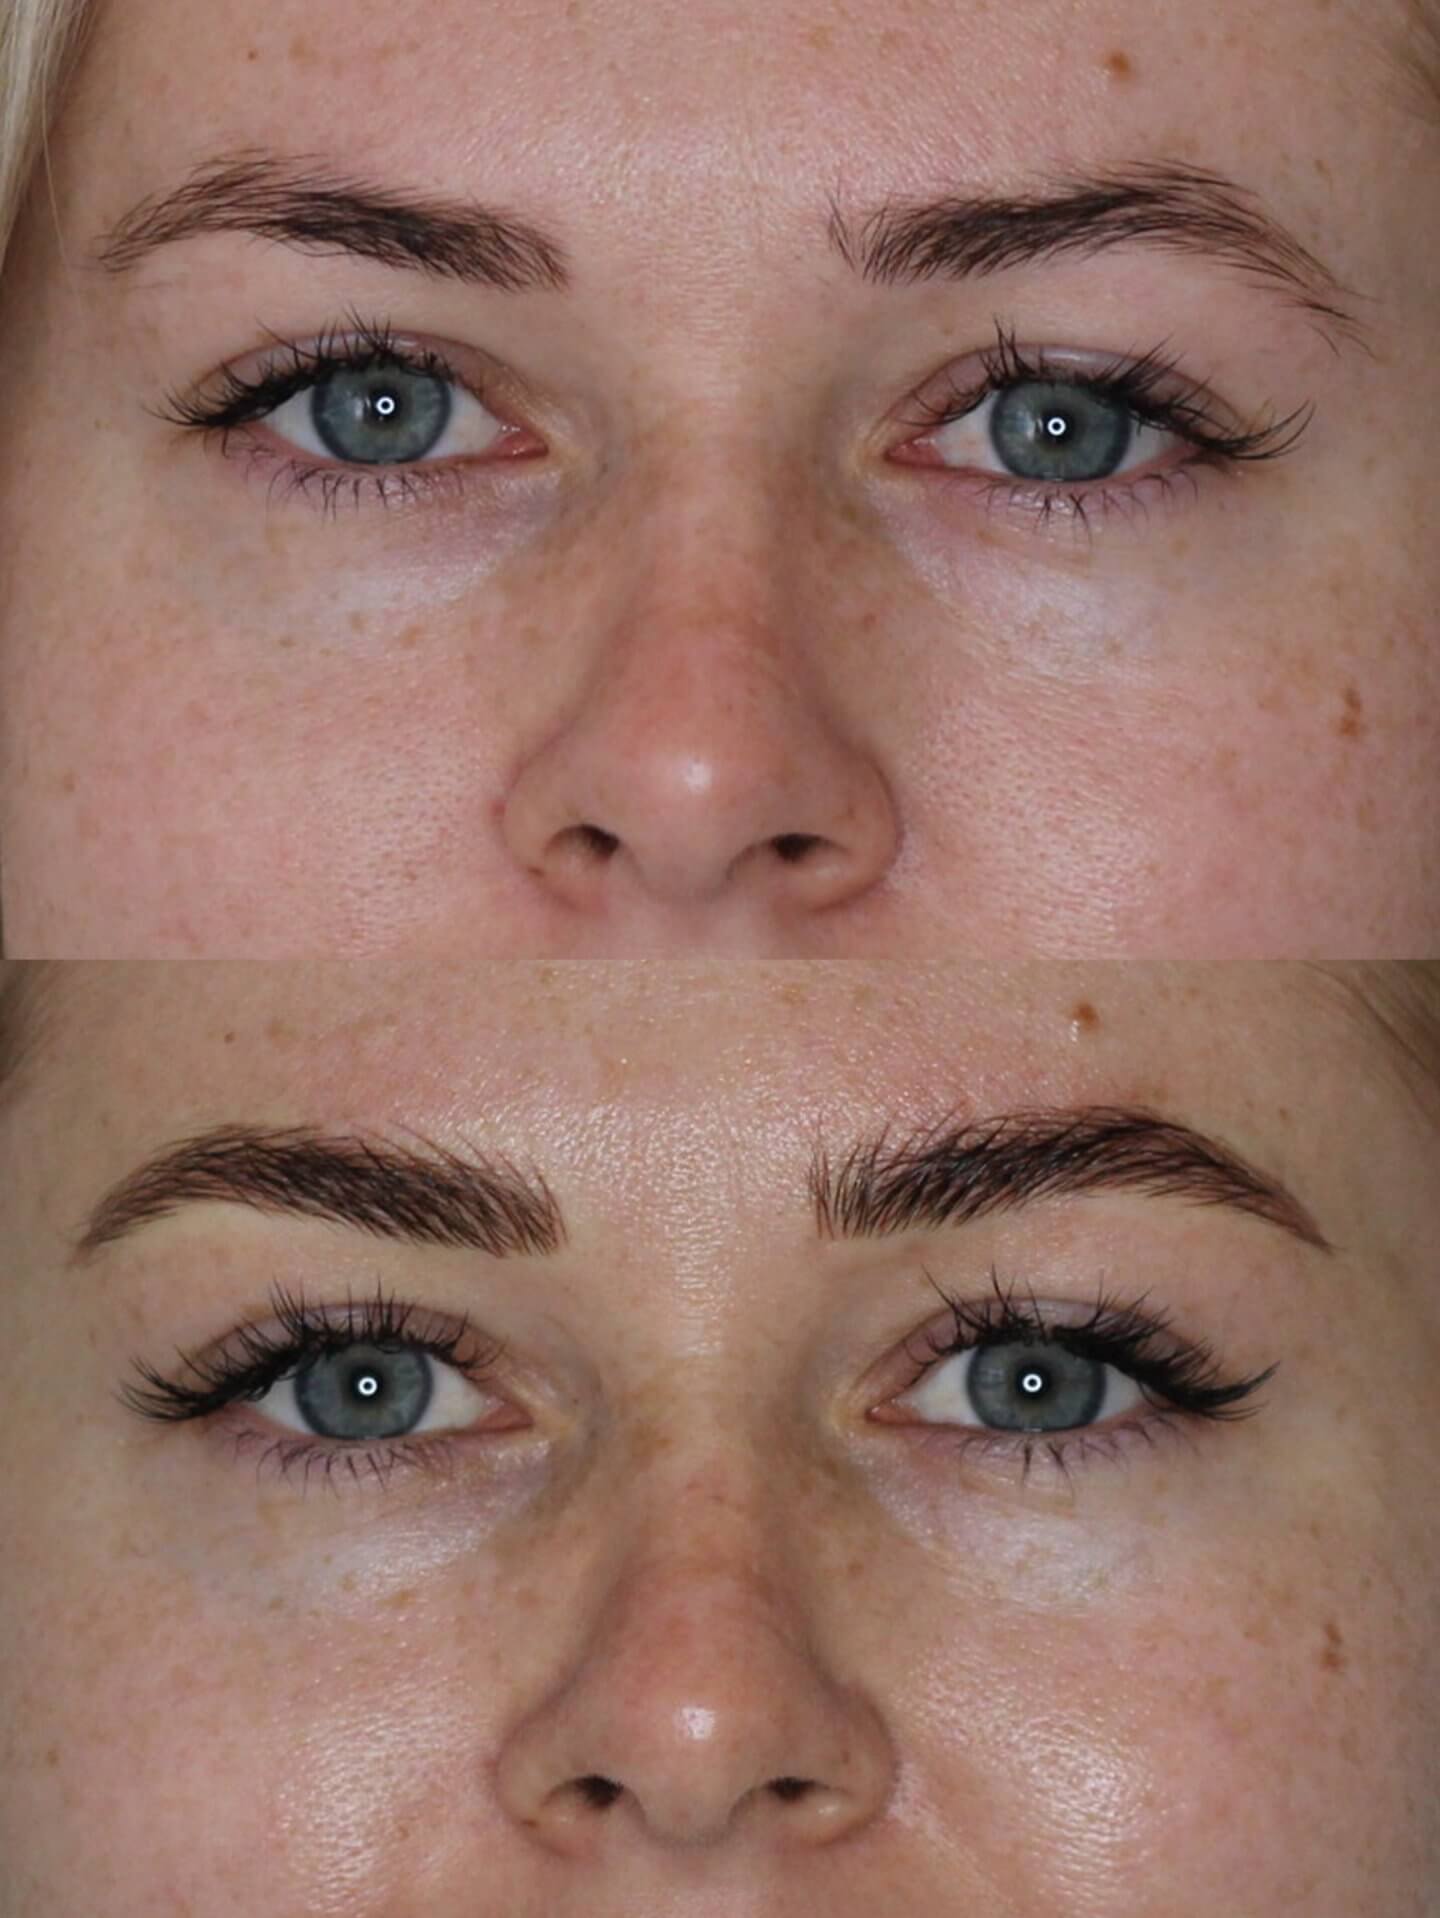
These shots are before microblading and after the first session.

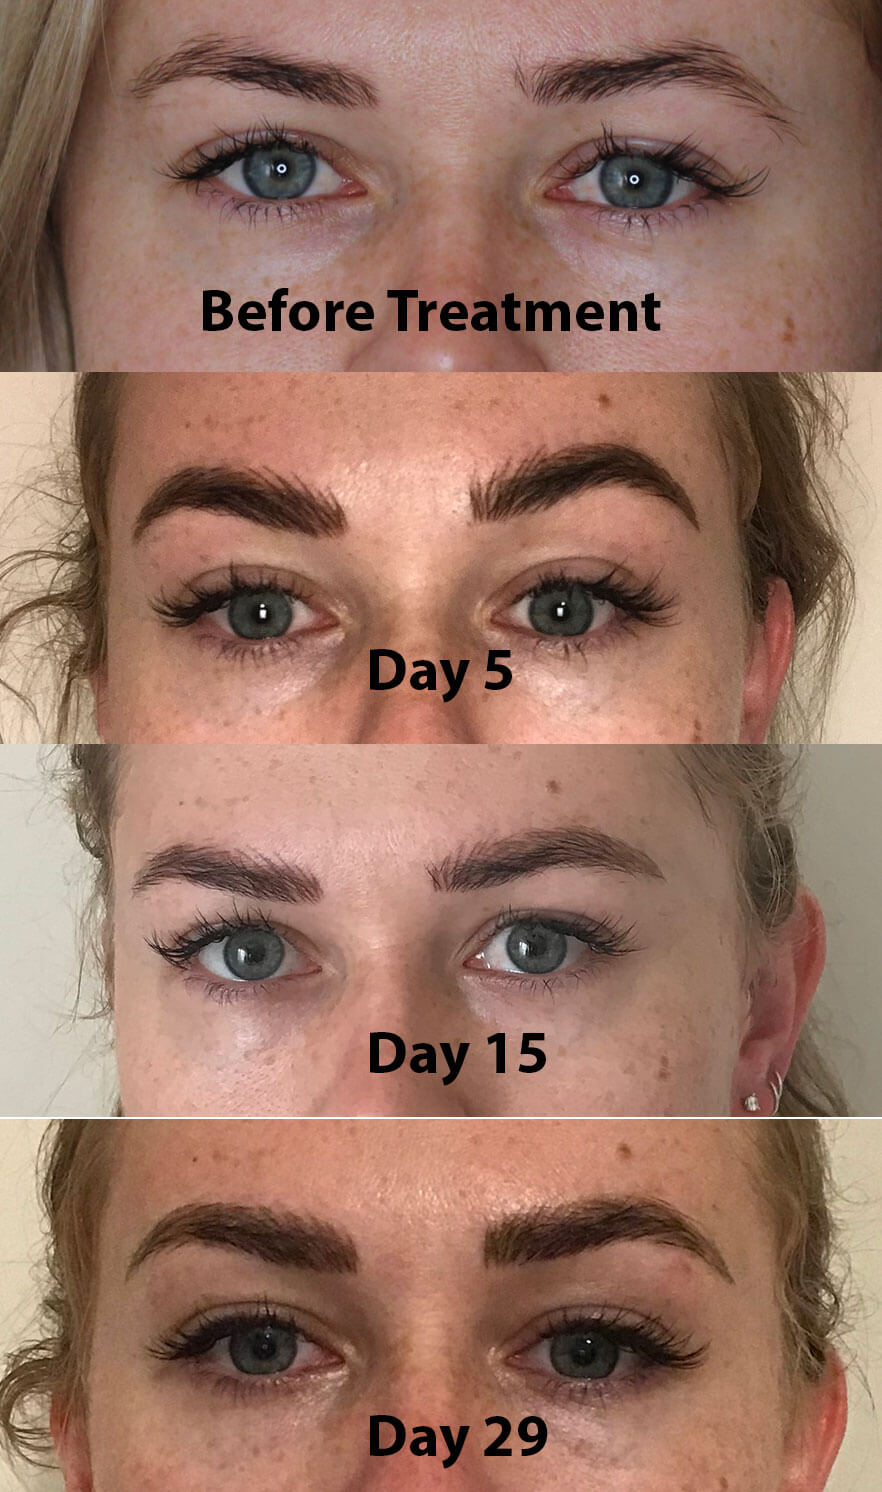
Progress Pictures

Long Term Aftercare
To ensure longevity and to keep your brows looking their best, you need to follow some aftercare steps;
- Always reduce sun exposure to your brows and use SPF 50
- Keep acid exfoliators away from your brows
- Top up treatment is required 6-12 months from treatment for most people, although it may be longer for others
Would I Recommend Microblading?
Absolutely. In complete transparency, Victoria offered me this treatment in exchange for an honest review as I mentioned in my introduction. I’d been thinking of having my brows tatooed for around 5/6 years, going back to when I first started my blog. I hadn’t seen anyone locally that I loved the work of and it wasn’t until Victoria qualified in microblading and had been doing treatments for many months that we spoke about microblading for myself. I trust Victoria 100%, and that’s the reason I felt confident in letting her work on my brows. If you’re thinking of having your eyebrows microbladed, I implore you to do your research; look at their work, check their hygiene standards and make sure they use professional products.
I know Victoria’s hygiene standards are high; all surfaces are covered and everything is cleaned thoroughly, you can even see her ‘Clean Freak’ highlight video on her Instagram page. Victoria qualified with KB PRO and only uses their professional products.
My new brows save me so much time, I just apply a slick of clear brow mascara and I’m ready to go. I still have them waxed and tinted, but tinting is a lot less regular than prior to having the treatment.
How Much Does It Cost?
Microblading costs vary significantly depending upon experience, location, products and training. Victoria charges £395 which is very competitive for a KB PRO trained aesthetician. I will need a top up within 12 months, top ups cost £195 and I fully intend to pay this myself to have them topped up. I absolutely adore them.
Where Is H Beauty Located?
H Beauty is located in Baildon in West Yorkshire. If you’re interested in having your brows microbladed by Victoria, give her a call 07954389885. If you’d like to see more of her work, follow her Instagram and check out her videos and pictures on Facebook, my brows are her cover photo too.
If there are any questions that I haven’t answered, leave me a comment and I’ll be sure to get back to you.
Lauren xx